
Excessive Industries Rear NBO Bumper Installation - 2015 JKU
August 7, 2017
A detailed guide on installing the Excessive Industries Rear NBO bumper on a 2015 JKU, focusing on prep work and installation tips.
Quick Look
- 🔔 Please CLICK THE BELL if you want to see my videos! 🔔
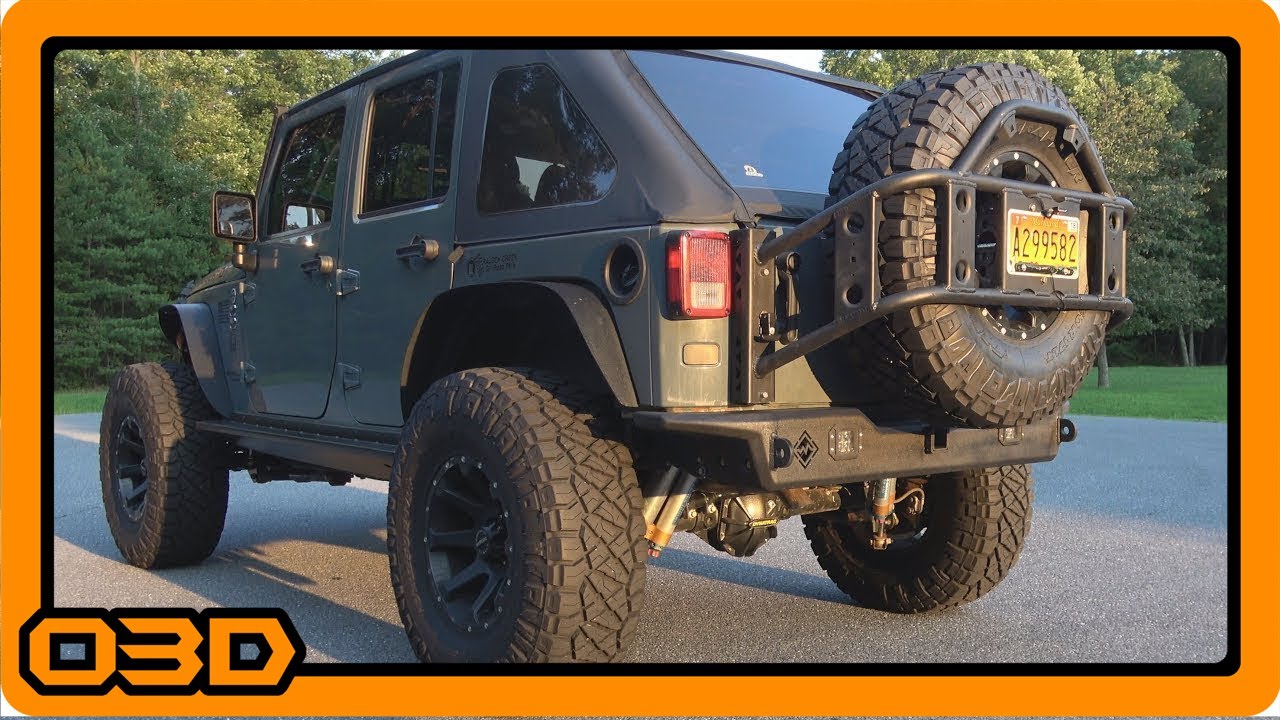
- This is the install of the Excessive Industries Rear NBO (Nearly Bolt On) bumper on OVERCLOCK3D - a 2015 Jeep Wrangler Unlimited (JKU).
- Some helpful O3D Jeeps links for you:
- Some helpful O3D Jeeps links for you:
- Some helpful O3D Jeeps links for you:
Overview
Installing a new rear bumper is one of the most impactful modifications you can make to your Jeep Wrangler Unlimited (JKU). Not only does it enhance the aesthetics, but it significantly improves functionality and off-road capability. In this article, we'll dive into the installation of the Excessive Industries Rear NBO (Nearly Bolt-On) bumper on a 2015 JKU, covering every step to ensure you get it done right.
What This Covers
We will go through the entire process of installation including:
- Preparation and safety precautions
- Cutting and modification requirements
- Step-by-step installation procedure
- Final adjustments and tips
Step-by-Step Breakdown
1. Gathering Tools and Materials
Before diving into the installation, make sure you have the following tools and materials ready:
- Angle grinder or sawzall for cutting
- Wrenches and socket set
- Drill and drill bits
- Hammer for rolling pinch seams
- Paint to touch up cut areas
2. Preparing for Installation
Start by cleaning out the area around the factory rear bumper to ensure a smooth workflow. Remove any brackets attached to the original bumper; they serve no purpose in this setup and can be tossed aside.
3. Marking the Frame for Cutting
Using a straight edge, like an aluminum level, mark where you will need to cut off the bottom section of the frame. Aim to cut at a place that allows for generous clearance without compromising structural integrity.
4. Making the Cuts
This part may seem daunting, but take your time. Use your angle grinder or sawzall to carefully cut along the marked line. Focus also on making a 45-degree cut at the frame end for optimal fit and clearance.
5. Cleaning Up the Cut Area
After cutting, use a grinding wheel to smooth out any jagged edges and ensure everything is flush. This step is crucial to prevent any potential damage during installation.
6. Installing Lights (Optional)
If you have rear lights to install, now is the time. The bumper comes equipped with cutouts to accommodate LED pods. Ensure wiring is tucked away properly to avoid any obstructions.
7. Final Installation
Fit the bumper onto the prepared frame. You'll need to line up the bolt holes with the factory mounting positions. Use the provided grade 8 mounting hardware for a secure fit. As you tighten, pay attention to any alignment issues.
Helpful Tips
Here are a few tips to make your installation smoother:
- Take breaks if you find yourself getting frustrated; a clear mind is essential for precision.
- Double-check all measurements before cutting — remember, measure twice, cut once!
- Use a mallet to adjust bumper positioning without damaging the frame.
Key Takeaways
The installation of the Excessive Industries Rear NBO bumper is a rewarding project that enhances both the look and capabilities of your Jeep. With careful preparation, a steady hand, and the right tools, you can achieve a professional-level installation in your garage. Not only will you enjoy improved ground clearance and strength, but you’ll also have the confidence to tackle tougher off-road challenges with your modified JKU.