
Install 03 - Factory Console USB with Aftermarket Stereo - Seicane Android and 2015 Jeep Wrangler JK
September 9, 2017
Learn how to connect the factory USB port in your Jeep Wrangler JK to an aftermarket stereo with this step-by-step guide.
Quick Look
Overview
Upgrading the stereo system in your Jeep Wrangler JK can significantly enhance your driving experience. Aside from improved sound quality, modern stereos offer a plethora of features including Bluetooth connectivity, GPS navigation, and USB connections for easy access to your devices. In this tutorial, we’ll focus on how to connect the factory USB port located in the center console to a Seicane aftermarket stereo model S18JP25. This upgrade allows you to retain the convenience of the factory USB connection while enjoying the benefits of a modern stereo.
What This Covers
This tutorial will guide you through the steps necessary to achieve a seamless connection between your factory USB port and the aftermarket stereo. We’ll take you through the necessary tools, the removal of various components, and how to make the final connections for a clean installation.
Step-by-Step Breakdown
- Gather Tools: Before starting, ensure you have the necessary tools including a 7mm socket wrench, a flathead screwdriver, and your Seicane USB adapter cable.
- Prepare Your Jeep: Put your Jeep in 'Drive' with the transfer case in 'Low' to create enough workspace. Engage the parking brake and turn off the ignition.
- Remove the Console Panel: The next step is removing the console panel. Look for the orange clips underneath the panel and press them to release. There are four clips to navigate here, so be gentle but firm.
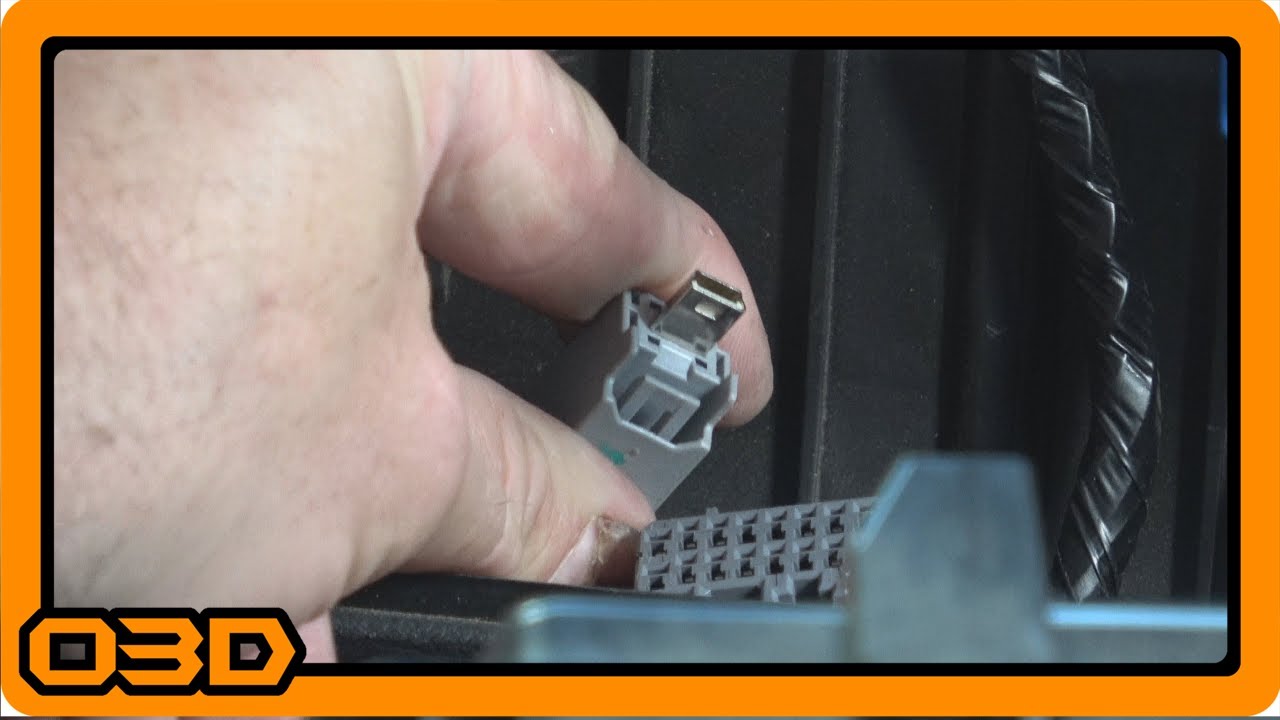
- Access the USB Connector: With the panel removed, locate the USB connector. You’ll find it plugged into the UConnect system. To access it, unscrew the two 7mm screws holding it in place.
- Connect the USB Adapter: Once freed, disconnect the USB cable from the UConnect box. Attach the Seicane adapter cable to this USB connector. This step is crucial as it allows you to funnel the USB connection to your new stereo.
- Install the Aftermarket Stereo: With the USB connected, route the cable up towards your new stereo unit. Ensure there’s enough slack to avoid pinching when the stereo is installed.
- Reassemble the Console: Before reinstallation, double-check all connections and tuck any excess wiring out of sight. Reinstall the console panel, ensuring all clips are securely in place.
- Testing Your Setup: Finally, before hitting the trails or the road, turn on your stereo and test the USB connection with a compatible device. Make sure everything is functioning correctly.
Helpful Tips
- Keep track of all screws and clips removed during the installation process; it can be quite frustrating if you lose one!
- Consider labeling the wires as you disconnect them to avoid confusion during reassembly.
- Ensure your aftermarket stereo is compatible with the Jeep’s electrical system to prevent any potential issues.
- If you plan to use additional USB devices in the future, consider installing a hub to centralize your connections.
Key Takeaways
Installing an aftermarket stereo in your Jeep Wrangler JK offers a great blend of modern functionality while preserving some original features, like the factory USB port. Following this step-by-step guide will make the process straightforward, ensuring you have a seamless setup that enhances your off-road and on-road adventures.